Oracle Backup
XLServer provides deep integration with Oracle (standalone, RAC, and physical standby) to automate backups, snapshots, cloning, recovery, and data masking. This guide covers the full lifecycle for live Oracle databases in XLServer, from linking (golden image) to day-2 operations.
1) Prerequisites
- Oracle host(s) reachable from XLServer.
- Database in ARCHIVELOG mode.
- Valid Oracle user with backup privileges and access to catalog system views (see Appendix: Oracle User).
- SSH access from XLServer to all database hosts (and all RAC nodes).
- Oracle version ≥ 10gR1.
- Sufficient free capacity in the XLServer datastore for the golden image + snapshots.
- NFS client installed on database host(s).
Do not attach production databases to the PUBLIC project.
Supported topologies
- Standalone Oracle database
- Oracle RAC (cluster database)
- Physical Standby
2) Link an Oracle Database
Linking performs the initial full backup (the Golden Image Copy) into the XLServer datastore and registers the database as a Live Database.
-
Open the Oracle database detail page (unlinked state).

-
Click Link Database (or Actions ▸ Link).
-
Credentials → enter Oracle username/password → click CHECK CONNECTION.
Proceed only if the connection succeeds.

-
Linking Parameters
- Mount Base: NFS mount point (e.g.,
/mnt/link) - RMAN Channels: number of channels (default 1, max 32)
- Project: destination project (defaults to the environment’s project)
- Default Snapshot Retention (days)
- Archived Redo Logs Deletion Policy: e.g., delete when not needed for recovery/standby
- Storage Optimization: enable compression and/or deduplication (space saving vs performance)
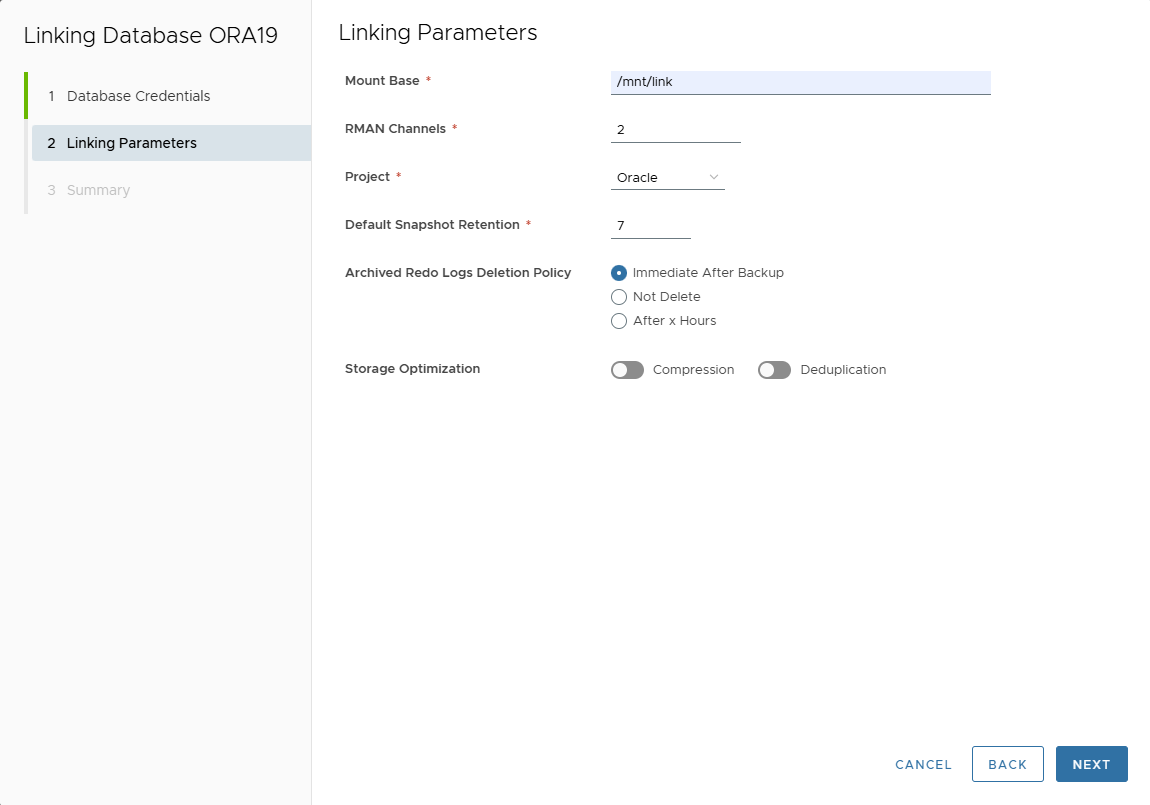
- Mount Base: NFS mount point (e.g.,
-
Summary → verify settings.
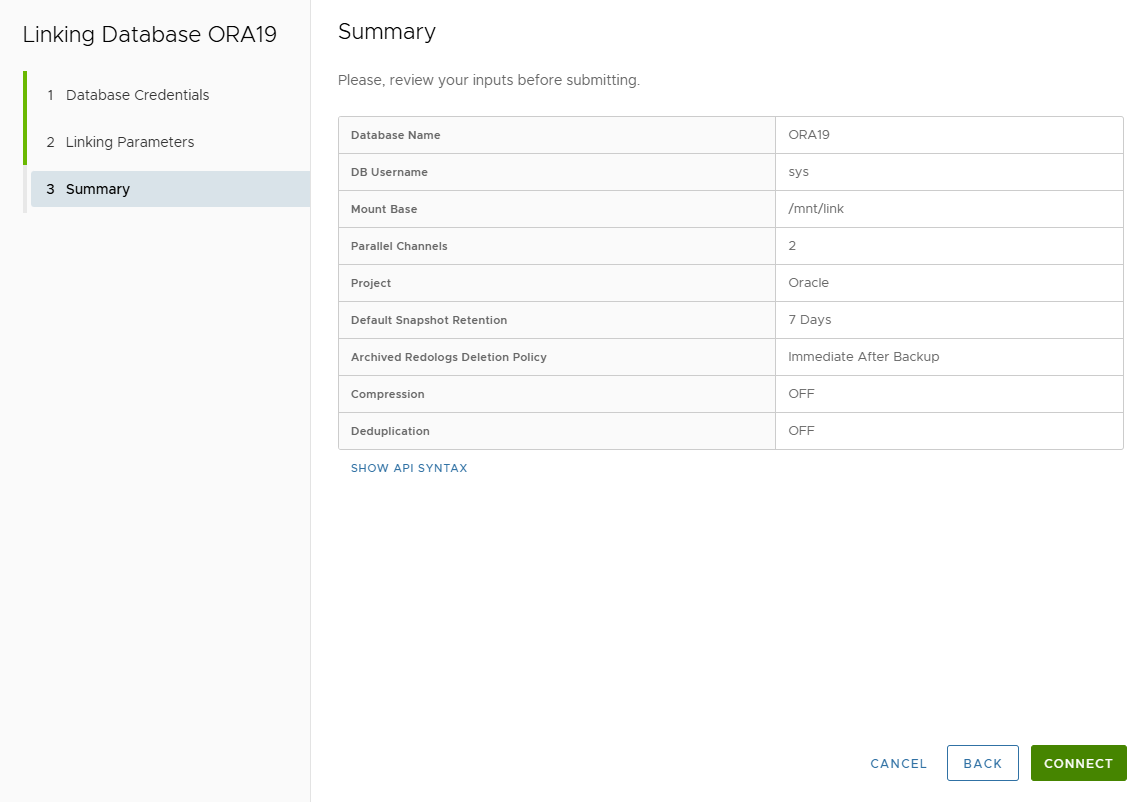
-
Click CONNECT to start linking.
-
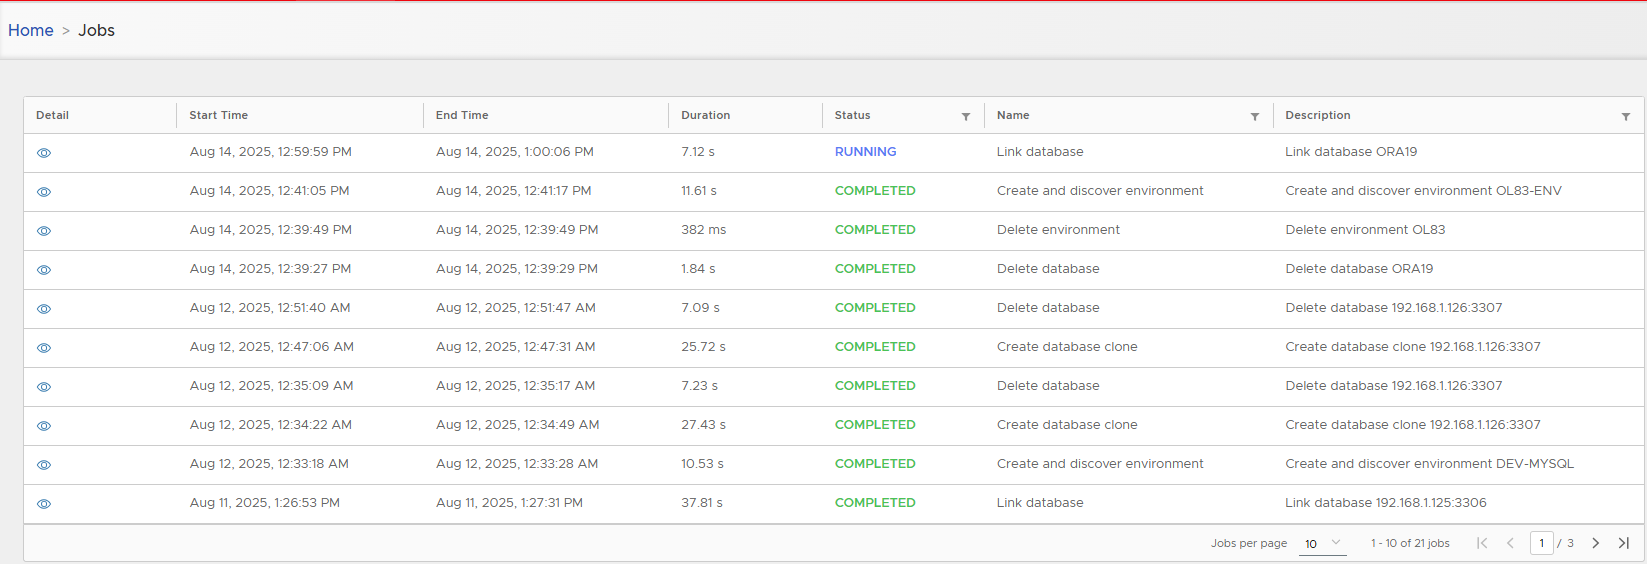
Track job progress in Jobs.
-
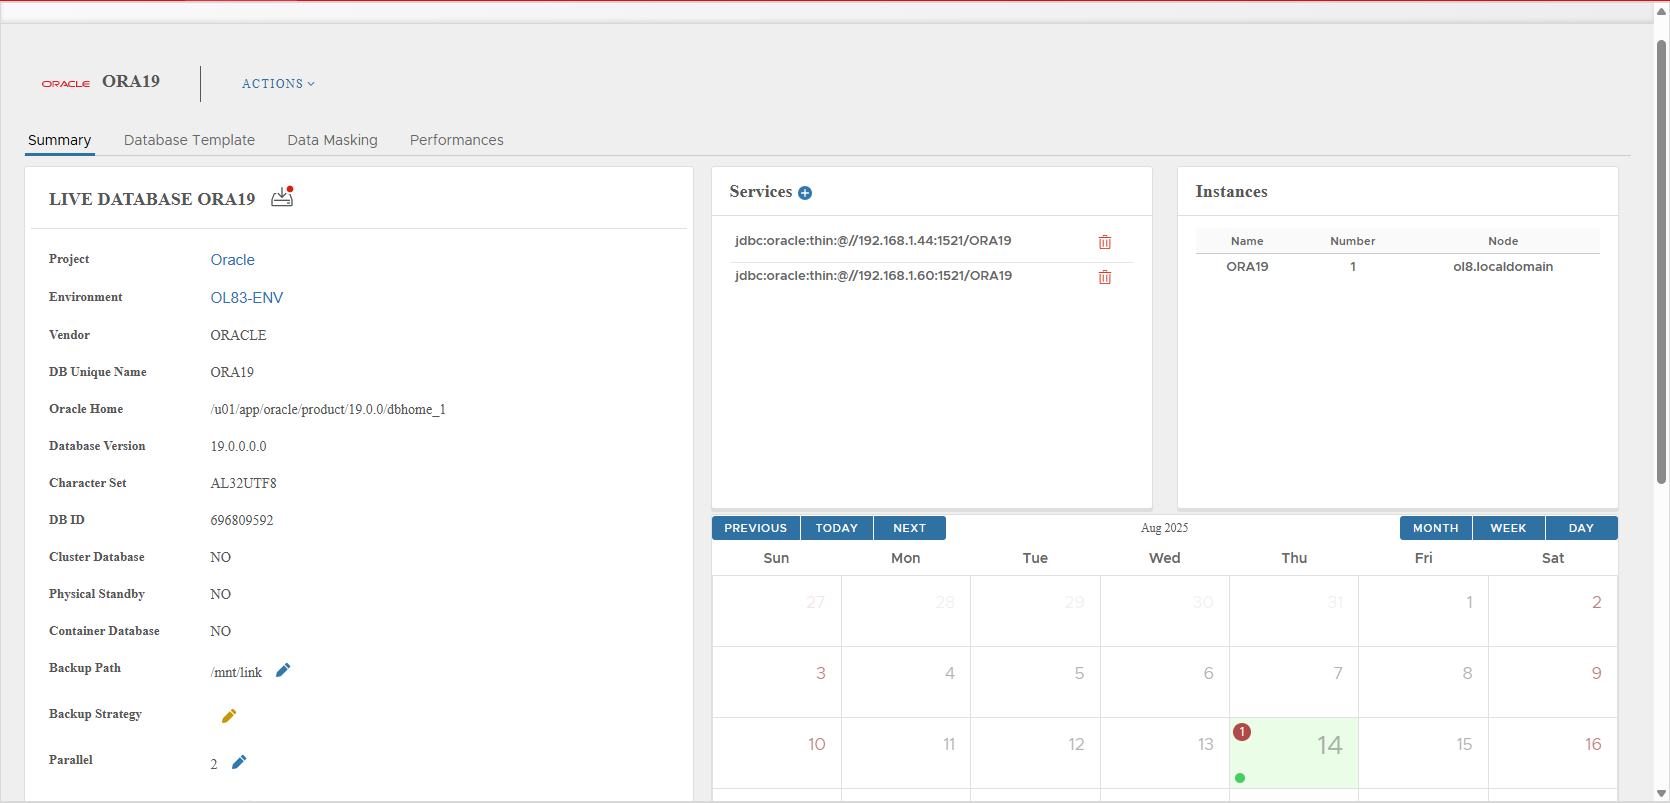
When finished, the database shows as linked (Live Database).
Note: Ensure the Oracle backup user has all required privileges. See Appendix: Oracle User. Also avoid attaching production DBs to
PUBLIC.
3) Live Database Detail — Tabs & Layout
The Live DB page has four tabs: Summary, Database Template, Data Masking, Performance.
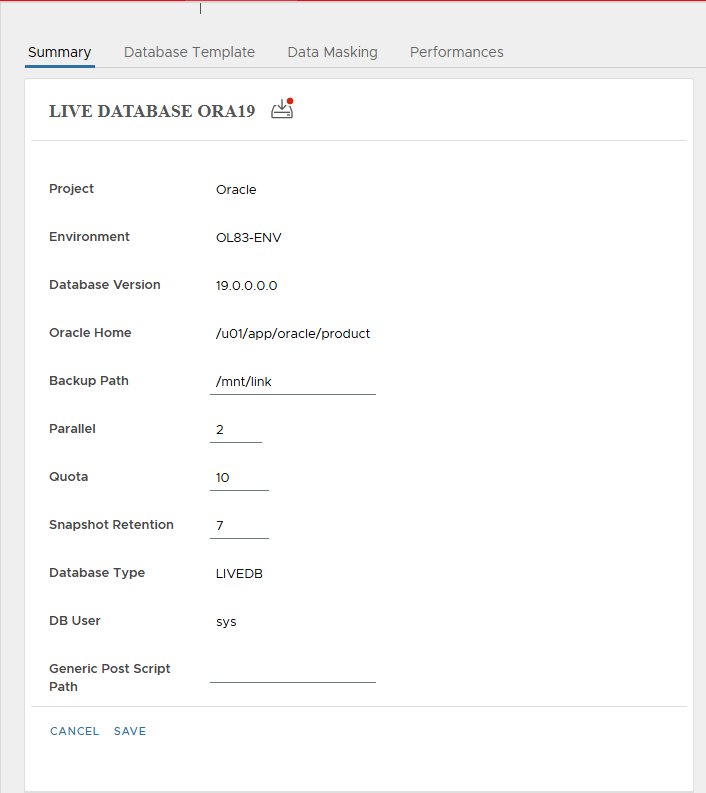
3.1 Summary
Database Parameters (key metadata & settings)
- Vendor, Environment, Project
- Oracle Home, RDBMS Version
- DB Unique Name, DB ID
- Character Set
- Cluster / Physical Standby / Container flags
- Backup Path (Mount Base)
- Backup Strategy (if assigned)
- Parallel (RMAN channels)
- Quota (max clones;
0= unlimited) - Snapshot Retention (default)
- DB credentials
- Generic Post Script Path (optional; executed on clone creation at target)
- Connecting Mode (ONLINE)
- Discovery (AUTO/MANUAL)
- Linked On, Last Refresh Time, Last Sync Time
- Created By
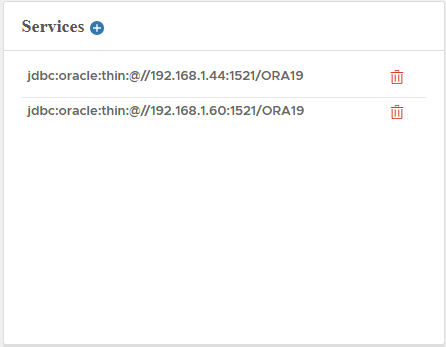
Database Services
List of service endpoints (auto-added at linking; can be managed manually).
Database Instances
All DB instances (1 for standalone; multiple for RAC).
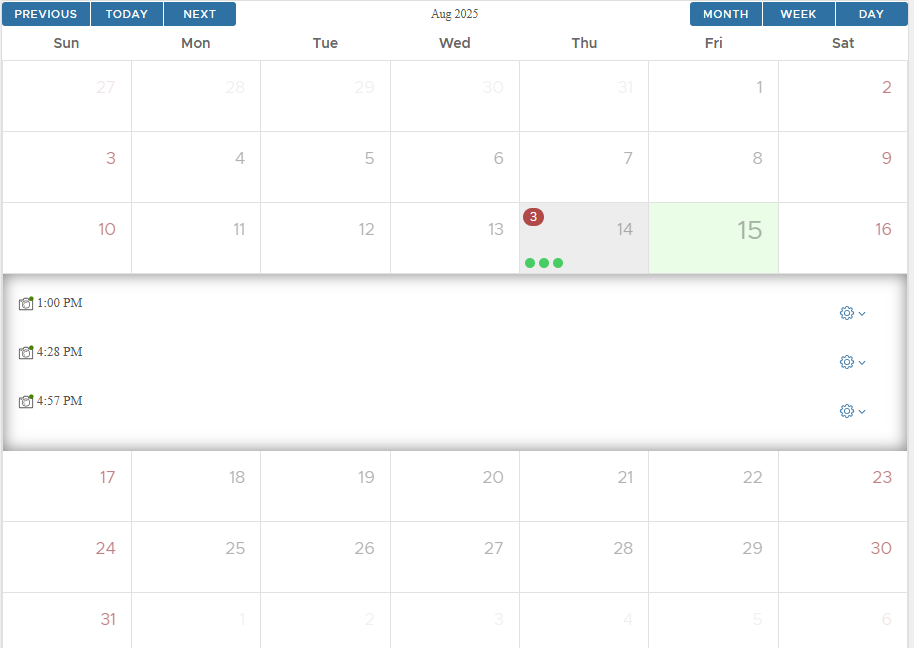
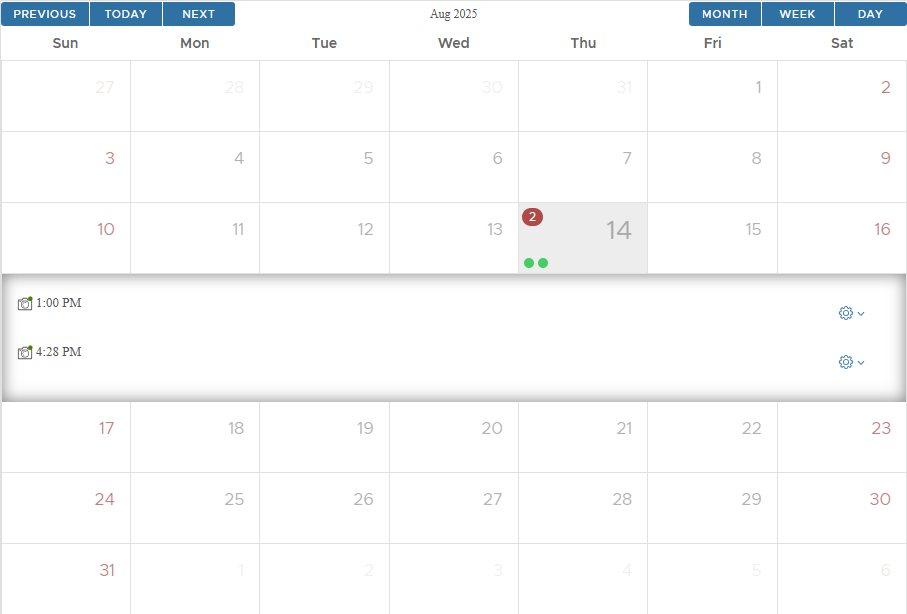
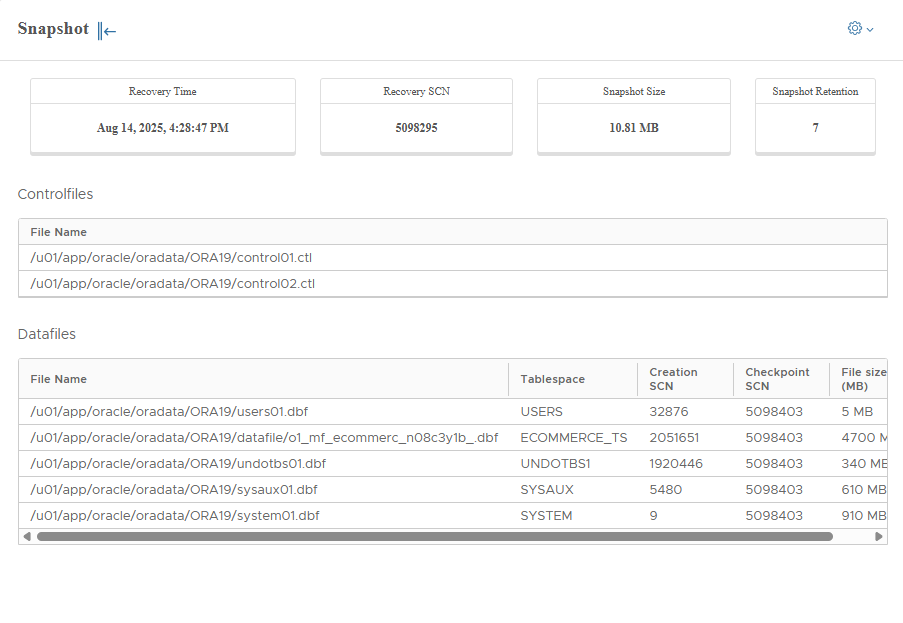
Snapshots Calendar
Shows snapshots; green = recoverable, red = failed.
Database Settings Reference
| Setting | Description | Default | Modifiable |
|---|---|---|---|
| Project | Project the DB belongs to | No | |
| Environment | Host/cluster the DB runs on | No | |
| Vendor | Always ORACLE | ORACLE | No |
| DB Unique Name | Oracle unique DB name | No | |
| Oracle Home | ORACLE_HOME | No | |
| Database Version | RDBMS version | No | |
| Character Set | Database charset | No | |
| DB ID | Database identifier | No | |
| Cluster Database | RAC indicator | No | |
| Physical Standby | Standby indicator | No | |
| Container Database | CDB indicator | No | |
| Backup Path | Base NFS mount path | Yes | |
| Backup Strategy | Attached strategy name | Yes | |
| Parallel | RMAN channels | Yes | |
| Quota | Max clones (0 = unlimited) | 10 | Yes |
| Snapshot Retention | Default retention (days) | 7 days | Yes |
| Database Type | Always “Live Database” | Live Database | No |
| DB User | Oracle credentials | Yes | |
| Generic Post Script Path | SQL to run on clone (target host) | Yes | |
| Connecting Mode | ONLINE (current release) | ONLINE | No |
| Discovery | AUTO or MANUAL | AUTO | No |
| Linked On | Date/time linked | No | |
| Last Sync Time | Last snapshot creation time | No | |
| Last Refresh Time | Last metadata refresh | No | |
| Created By | XLServer user who added it | No |
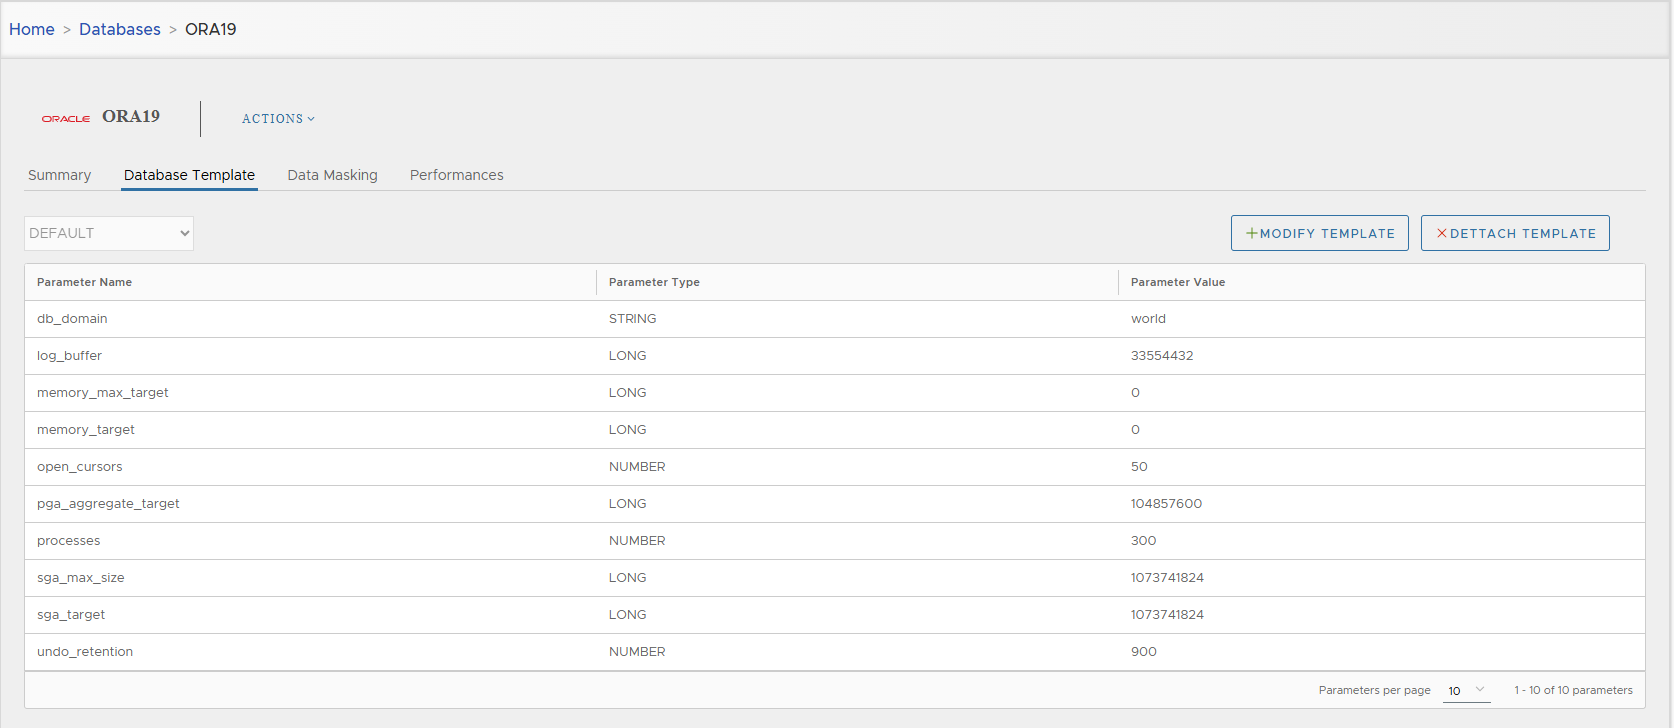
3.2 Database Template
Attach a Database Template so future clones inherit preset parameters.
Actions: ATTACH TEMPLATE, MODIFY TEMPLATE, DETACH TEMPLATE.
3.3 Data Masking
Attach Data Masking Templates so clones can mask sensitive data automatically.
(Full workflow in section 6. Data Masking.)
3.4 Performance
Operational insights:
- Snapshots for the last 7 days
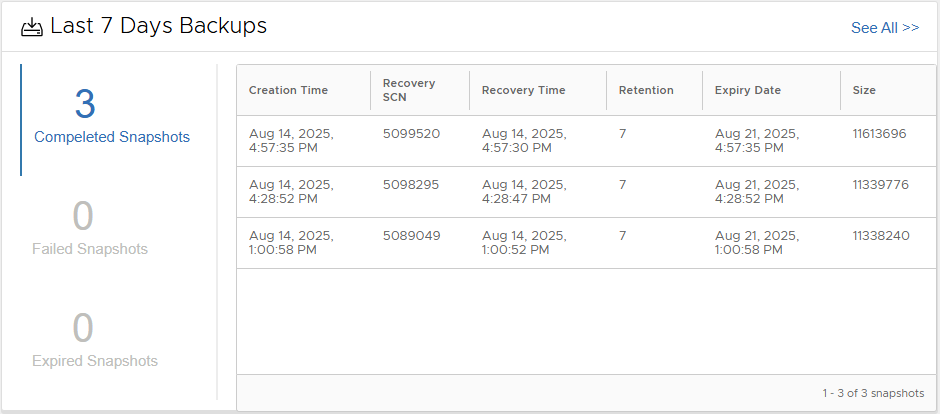
“See all” view with more details:

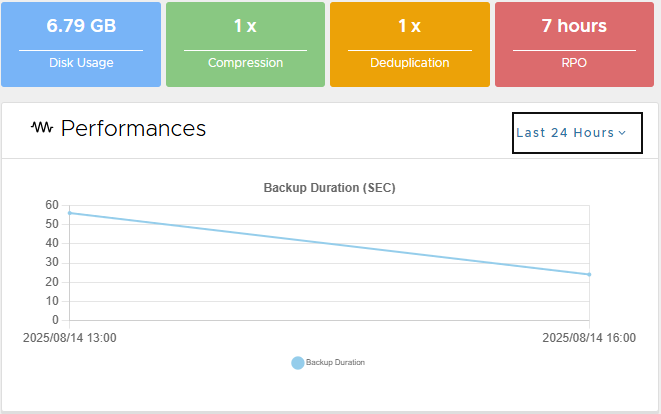
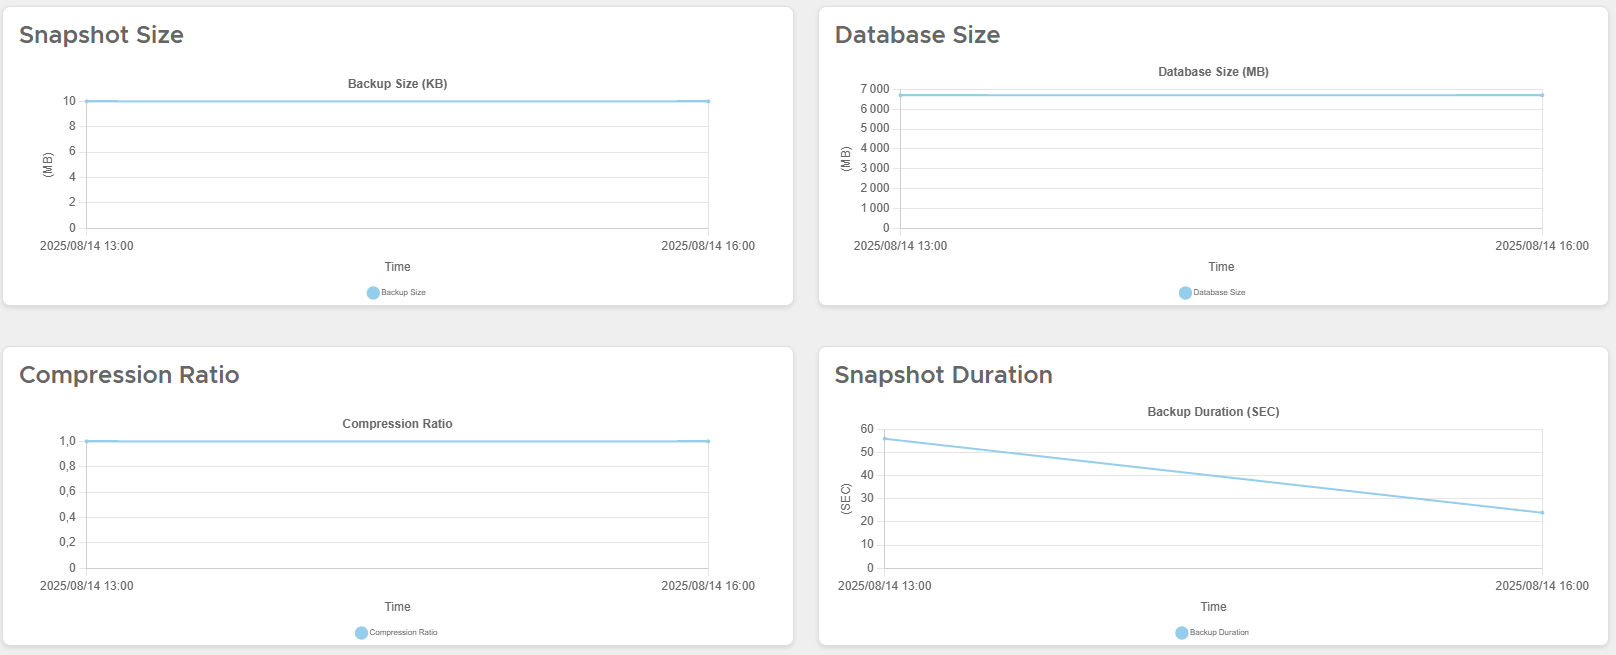
- KPI mini-cards: Disk Usage, Compression, Deduplication, RPO
- Backup duration trends (last day / 7 days / 30 days)
- Storage breakdown & health pies

- Time-series: Backup Size, DB Size, Compression Ratio, Backup Duration
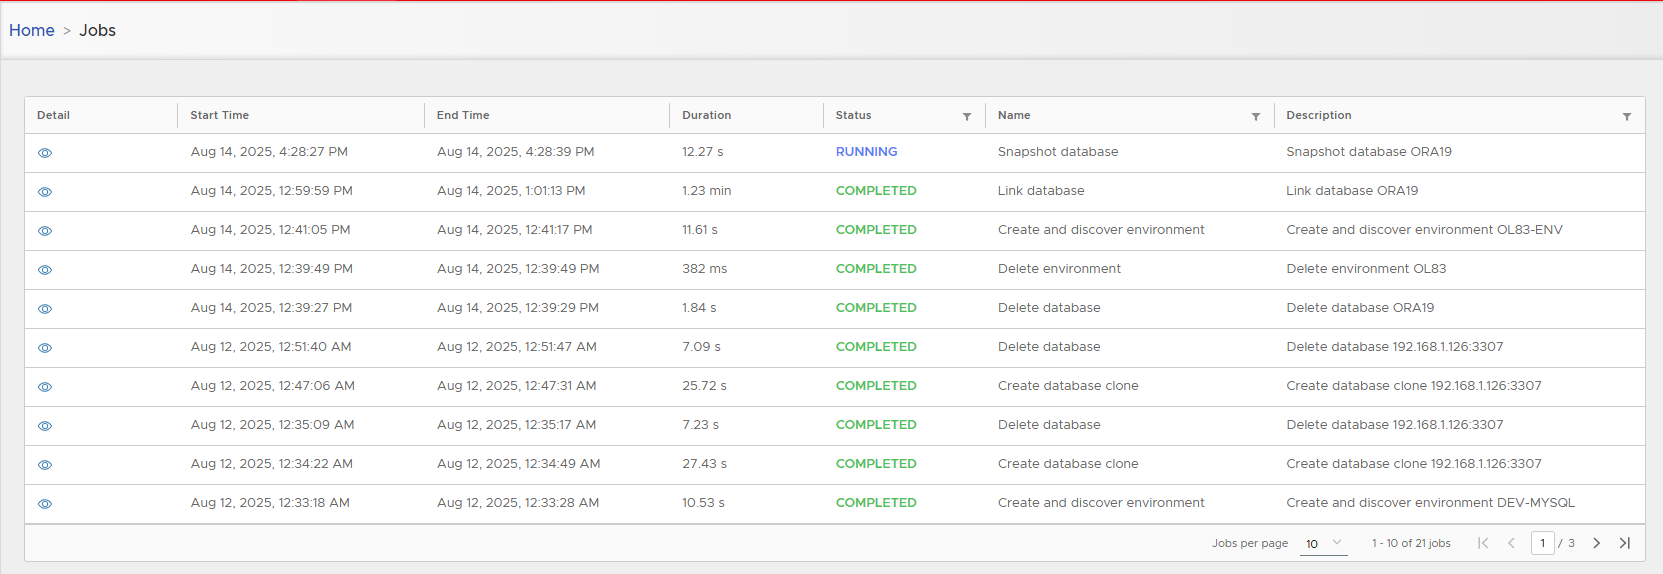
4) Day-2 Operations (Actions Menu)
4.1 Snapshot (Incremental Sync + Snapshot)
Creates an incremental backup (merged into the golden image) and a ZFS snapshot.
- Actions ▸ Snapshot → confirm.

- Track progress in Jobs.
- Browse snapshots via calendar (click the day to list):
- View snapshot detail:
From a snapshot’s cog menu you can:
- Create Virtual Database
- Create Physical Database
- Mount snapshot (source env)
- Restore
- Delete (only if unused and not the last snapshot)
- Close
Configuring Block Change Tracking (BCT) on live database will help to create snapshot quickly.
4.2 Backup Archivelogs
Creates a snapshot after backing up archived redo logs.
- Actions ▸ Backup Log → confirm.
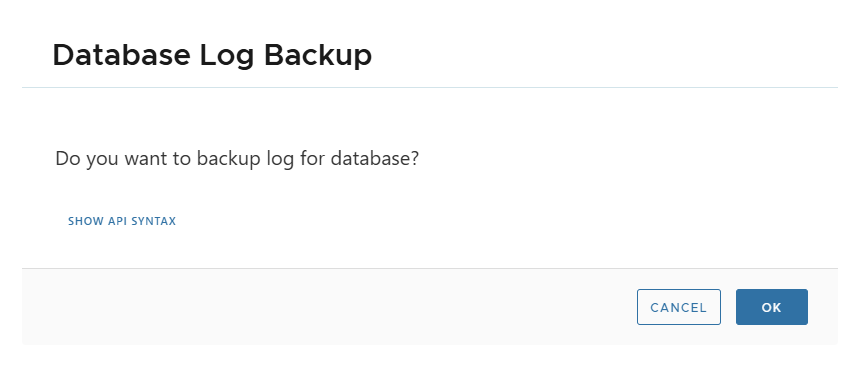
A new snapshot is created when the archivelogs backup finishes.
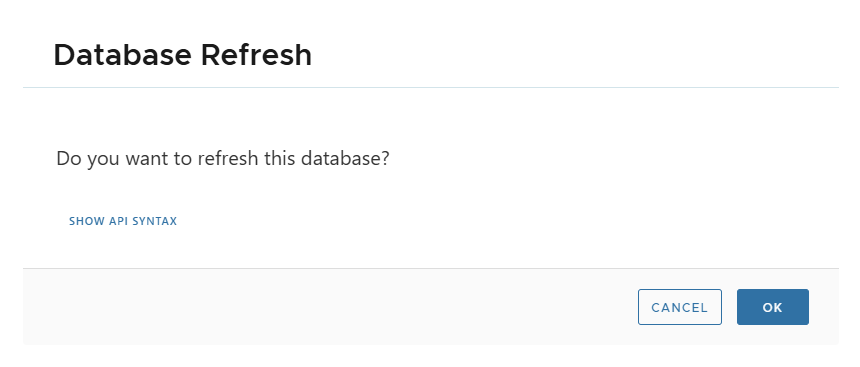
4.3 Refresh (Metadata only)
Refreshes database metadata/parameters without creating a snapshot.
- Actions ▸ Refresh → confirm.
4.4 Create Virtual Database (Instant Clone)
- Actions ▸ Create Virtual Database to clone up to the latest snapshot.
- To clone from a specific snapshot, open that snapshot’s detail and use its cog menu.
See Database Cloning chapter for the full wizard and parameters.
4.5 Create Physical Database
Same entry points as virtual clone, but creates a full, independent copy.
See Database Cloning chapter.
4.6 Mount Snapshot (Source Environment)
Mounts snapshot contents on the source environment for manual inspection or recovery tasks.
Important: Mounting creates a staging clone; backups are blocked while it is mounted. Unmount as soon as finished.
See Database Recovery chapter.
4.7 Restore
Restores the live DB to the latest snapshot (from Actions menu) or to a selected snapshot (from snapshot cog).
See Database Recovery chapter.
4.8 Disable / Enable
- Disable: blocks operations (e.g., for maintenance; prevents backups and cloning).
- Enable: re-allows operations.
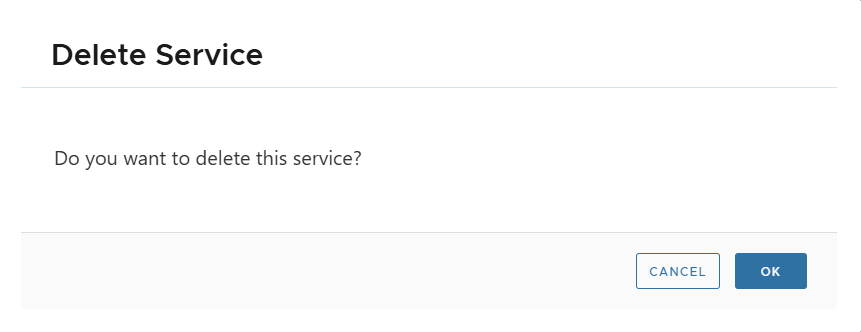
4.9 Delete Live Database
Actions ▸ Delete → confirm.
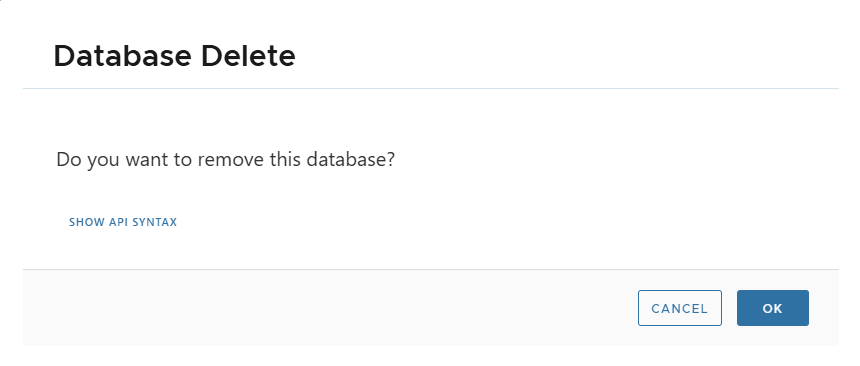
You cannot delete a live DB while it still has clones. Delete clones first.
5) Editing Settings
5.1 Edit a Single Setting
Click the pencil next to a setting (e.g., Quota), change the value, VALIDATE.

5.2 Bulk Edit
Click EDIT SETTINGS, modify multiple fields, SAVE (or CANCEL).
5.3 Change DB Credentials
From the live DB page, click the pencil near credentials, enter Username/Password, VALIDATE.
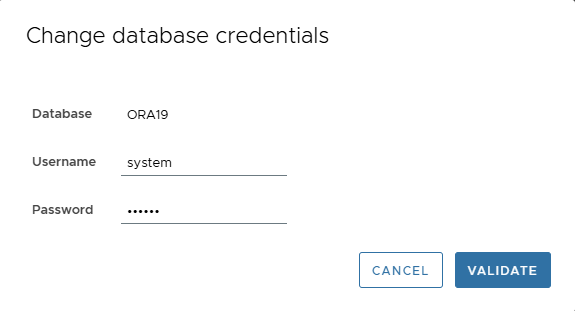
If credentials are invalid, you’ll receive an error.
6) Data Masking
XLServer supports:
- Column-level masking via templates (e.g., names, emails, SSNs).
- Whole-table shuffling (preserve distributions while anonymizing).
Masked data is applied during clone creation.
6.1 Column-Level Masking
- Data Masking tab → ADD TEMPLATE.
- Enter DB credentials → CHECK CONNECTION.

- Select a table.
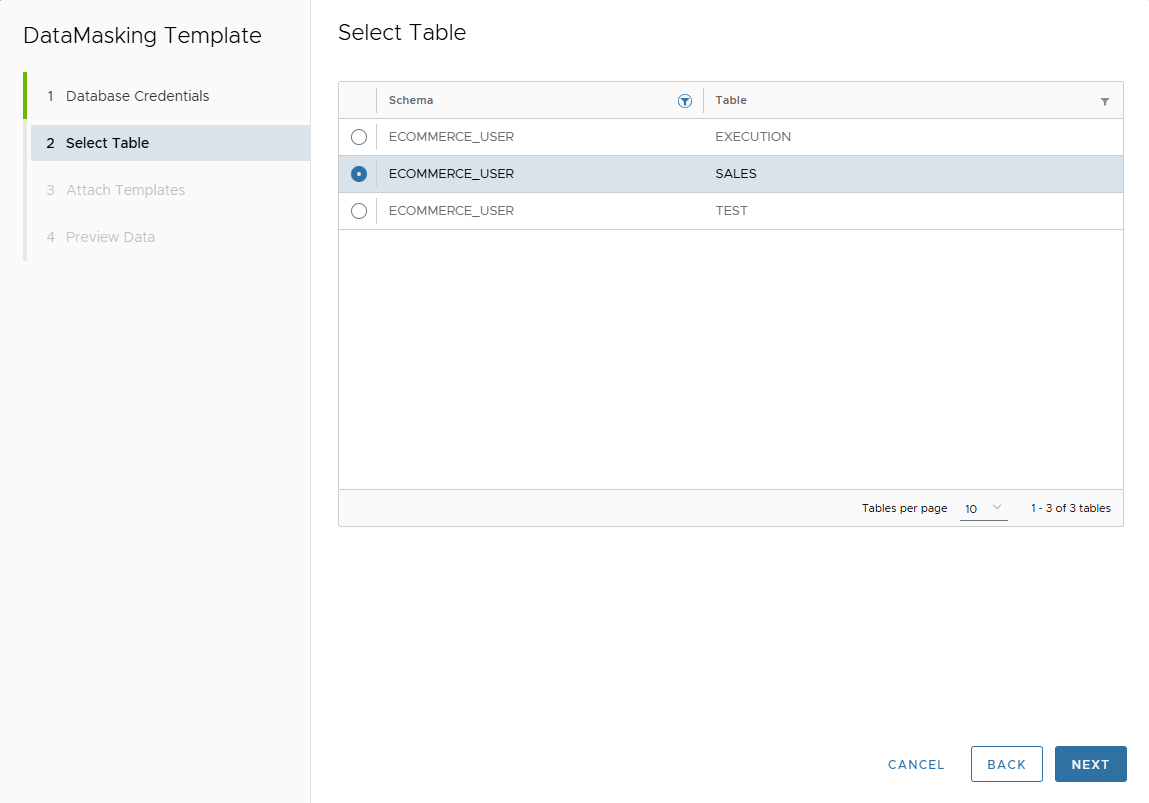
- Select columns to mask → click + to add a rule/template.
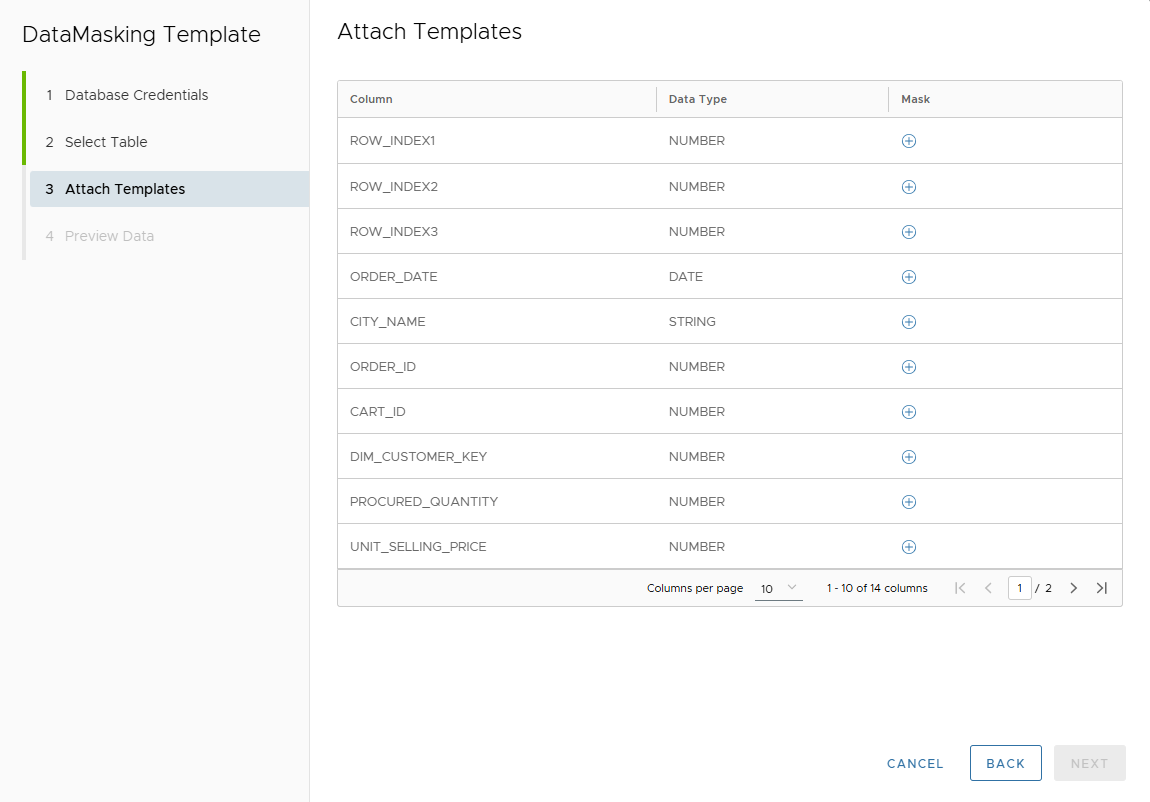
- Choose a template and fill required parameters → VALIDATE.
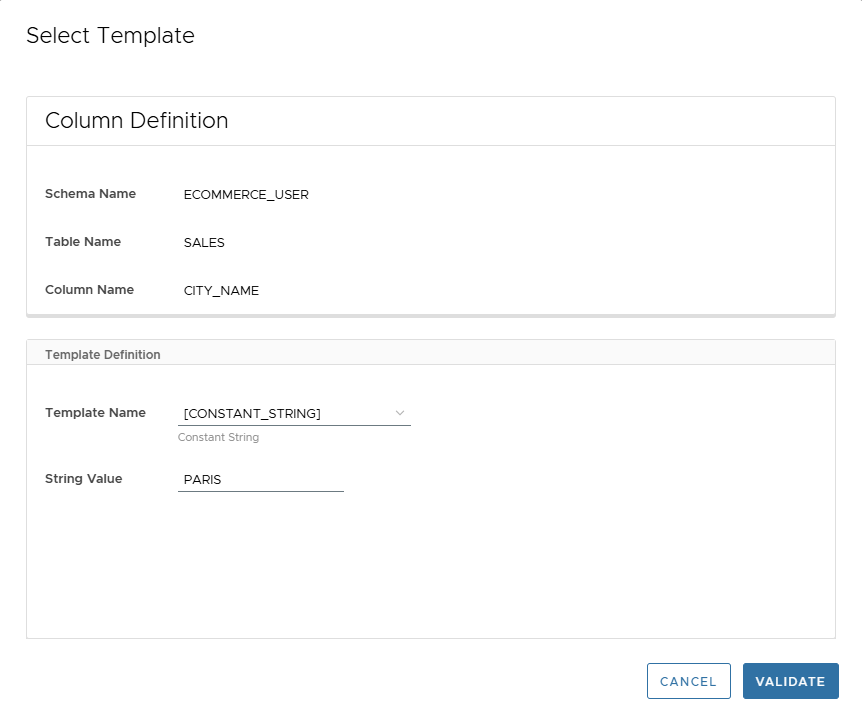
- Confirm the rule shows as attached.
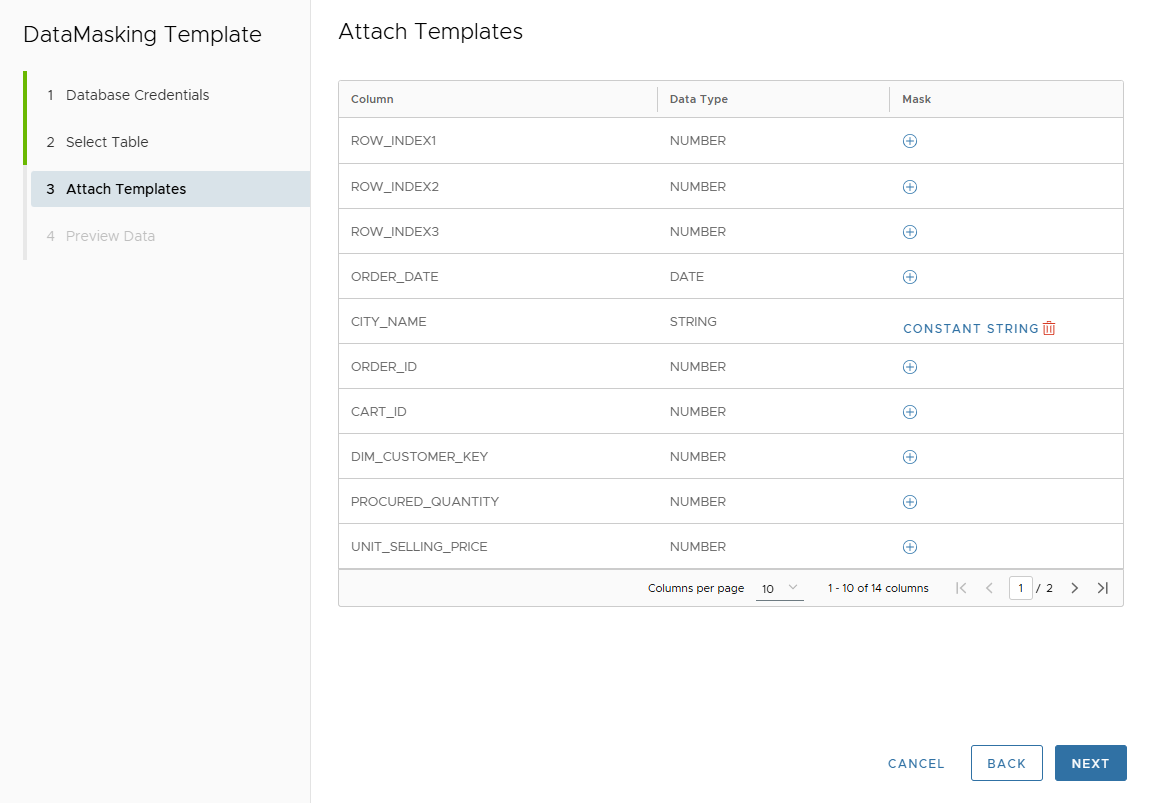
- Repeat for all sensitive columns → Next → review → FINISH.

All attached templates list under Data Masking.
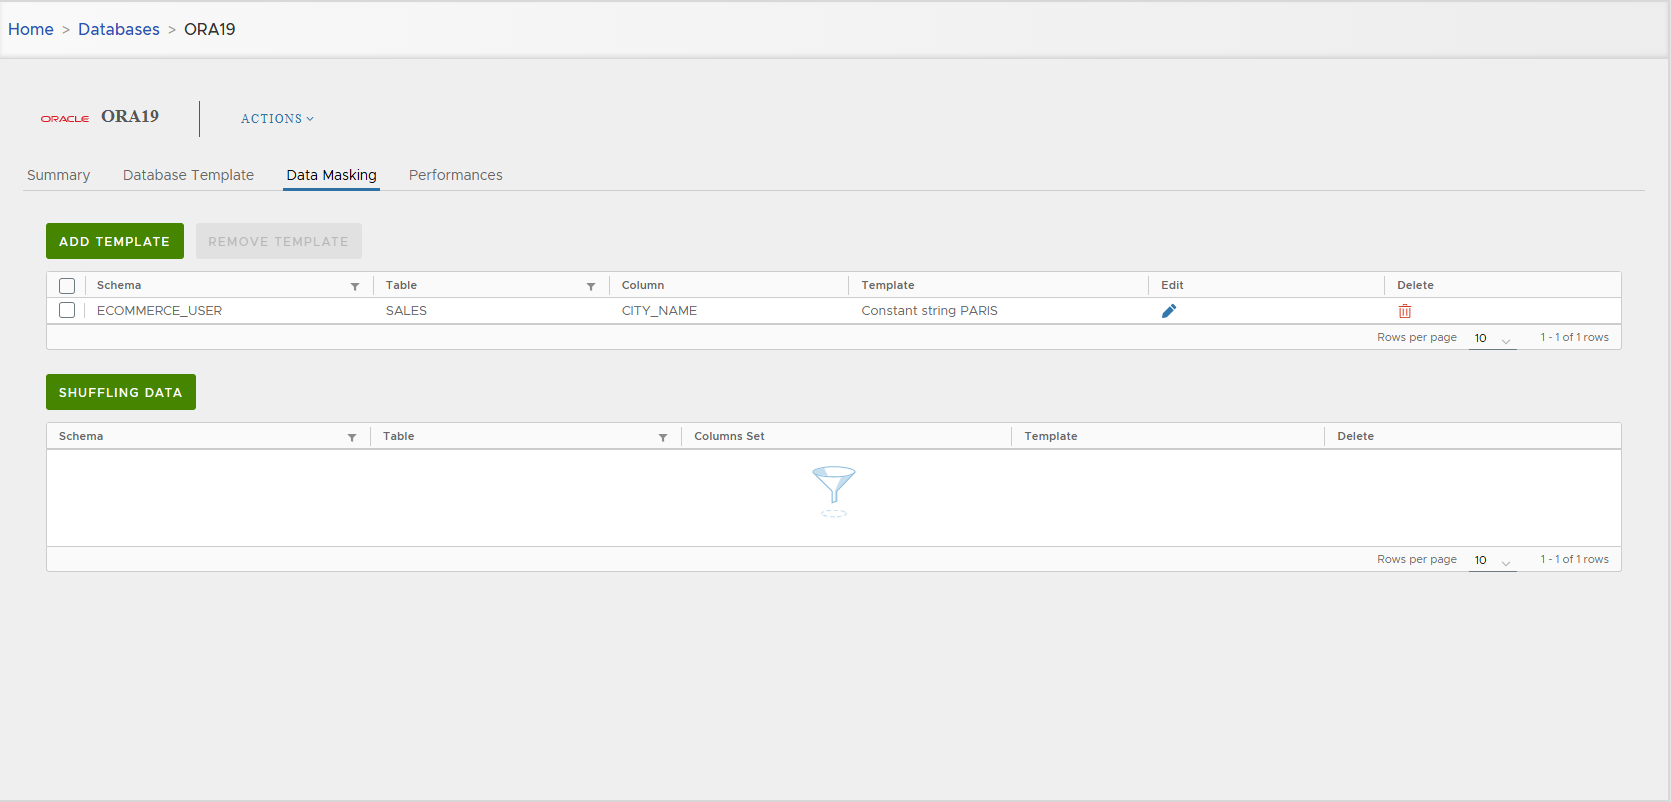
- To remove: select rows → REMOVE TEMPLATE.
- To edit: click the pencil.
6.2 Whole-Table Shuffling
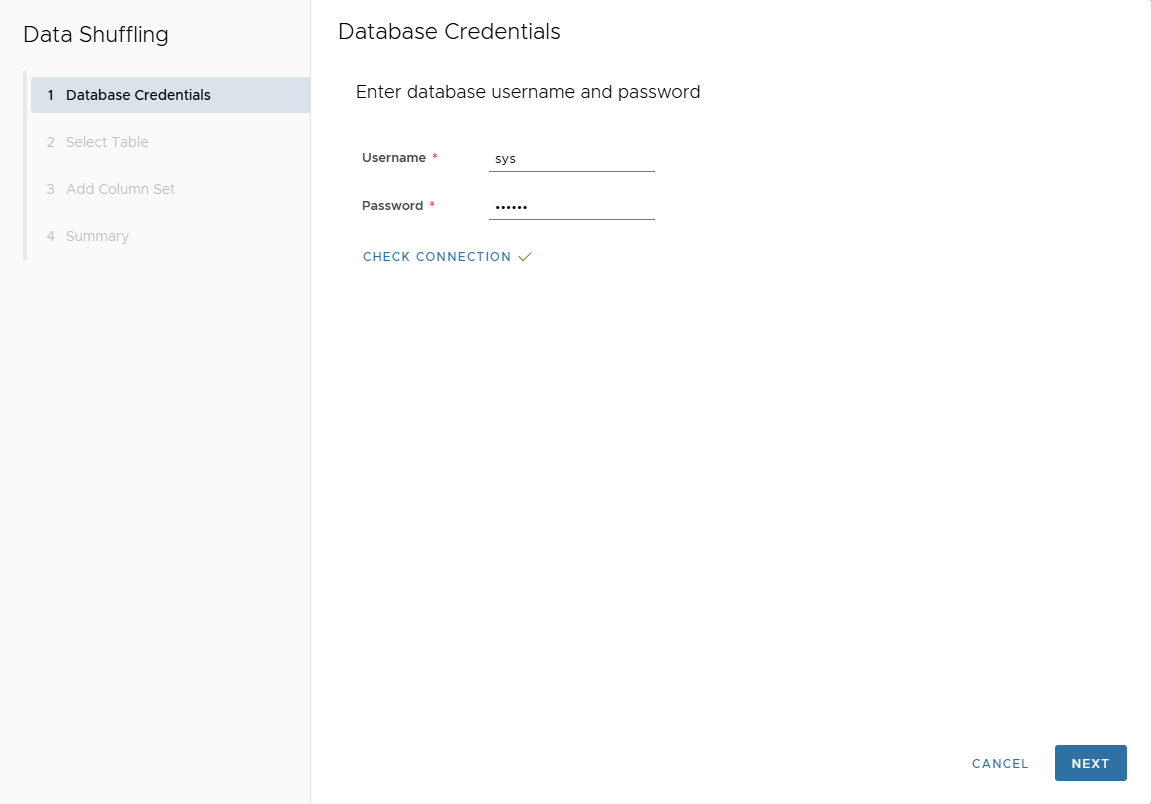
- SHUFFLING DATA → enter DB creds → CHECK CONNECTION.
- Choose table.
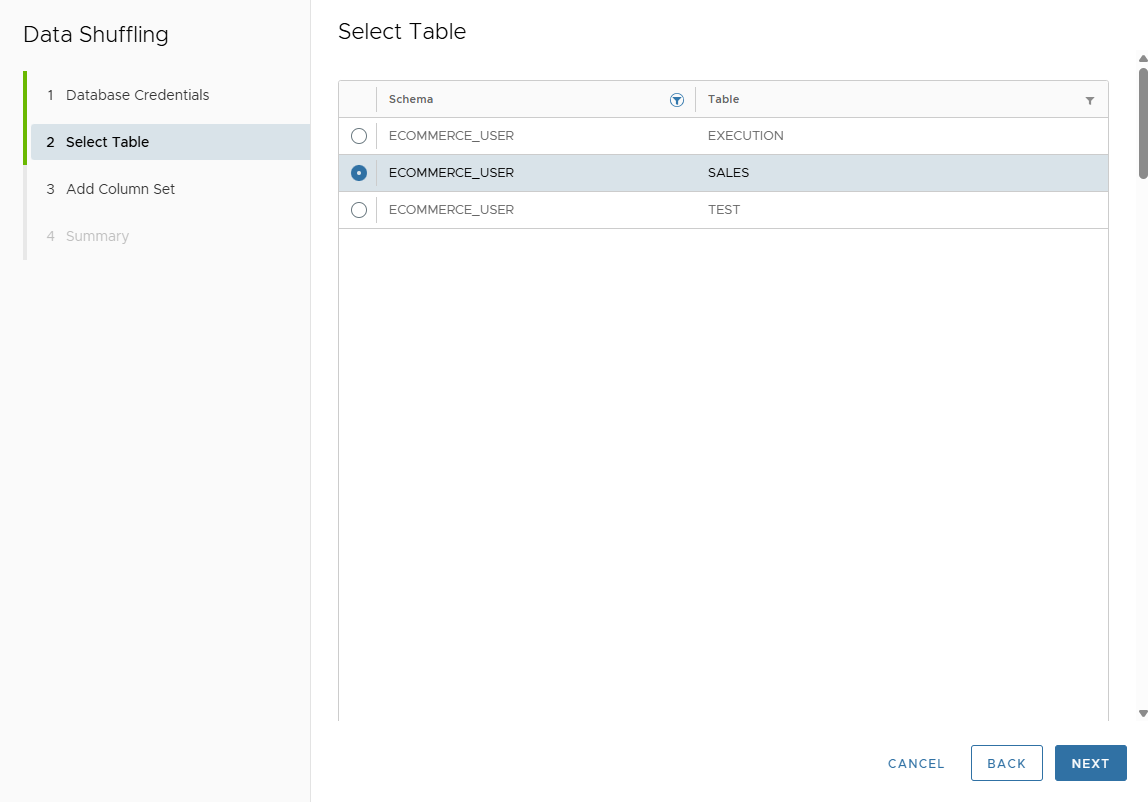
- Define up to three Column Sets (each set can contain multiple columns).
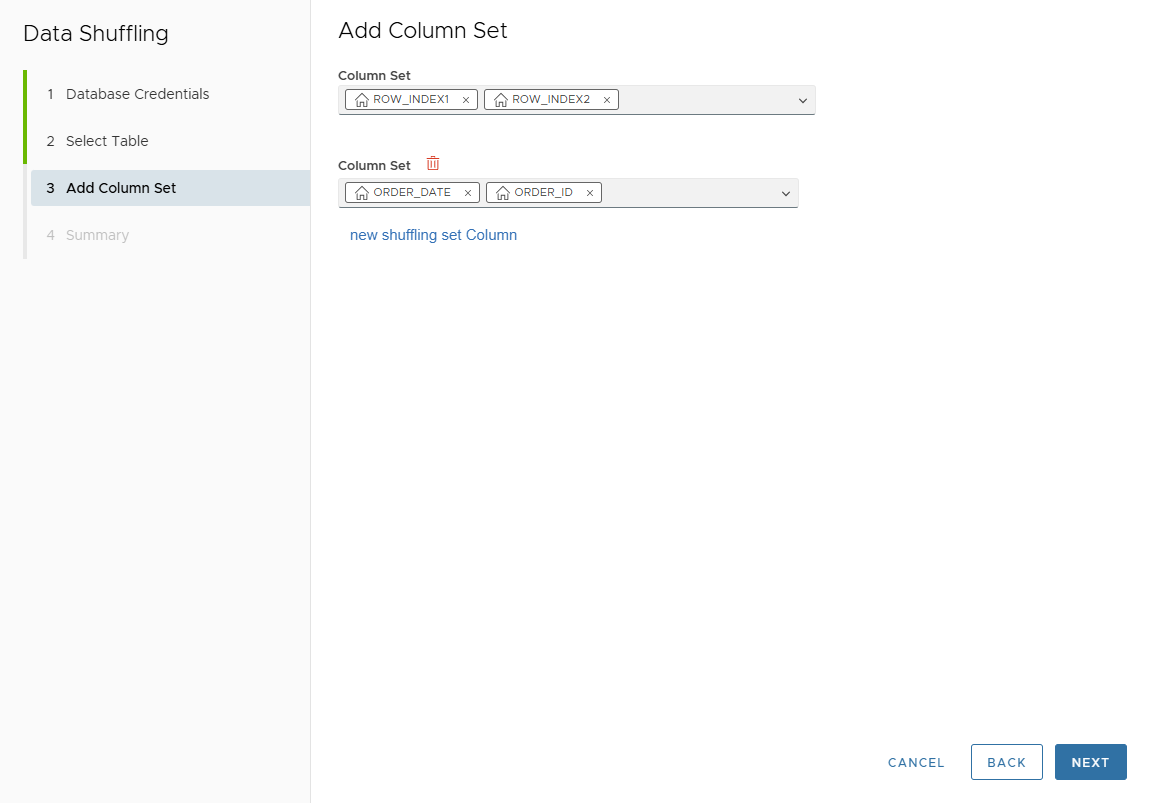
- Review & FINISH.
Shuffling definitions appear in the SHUFFLING DATA grid.
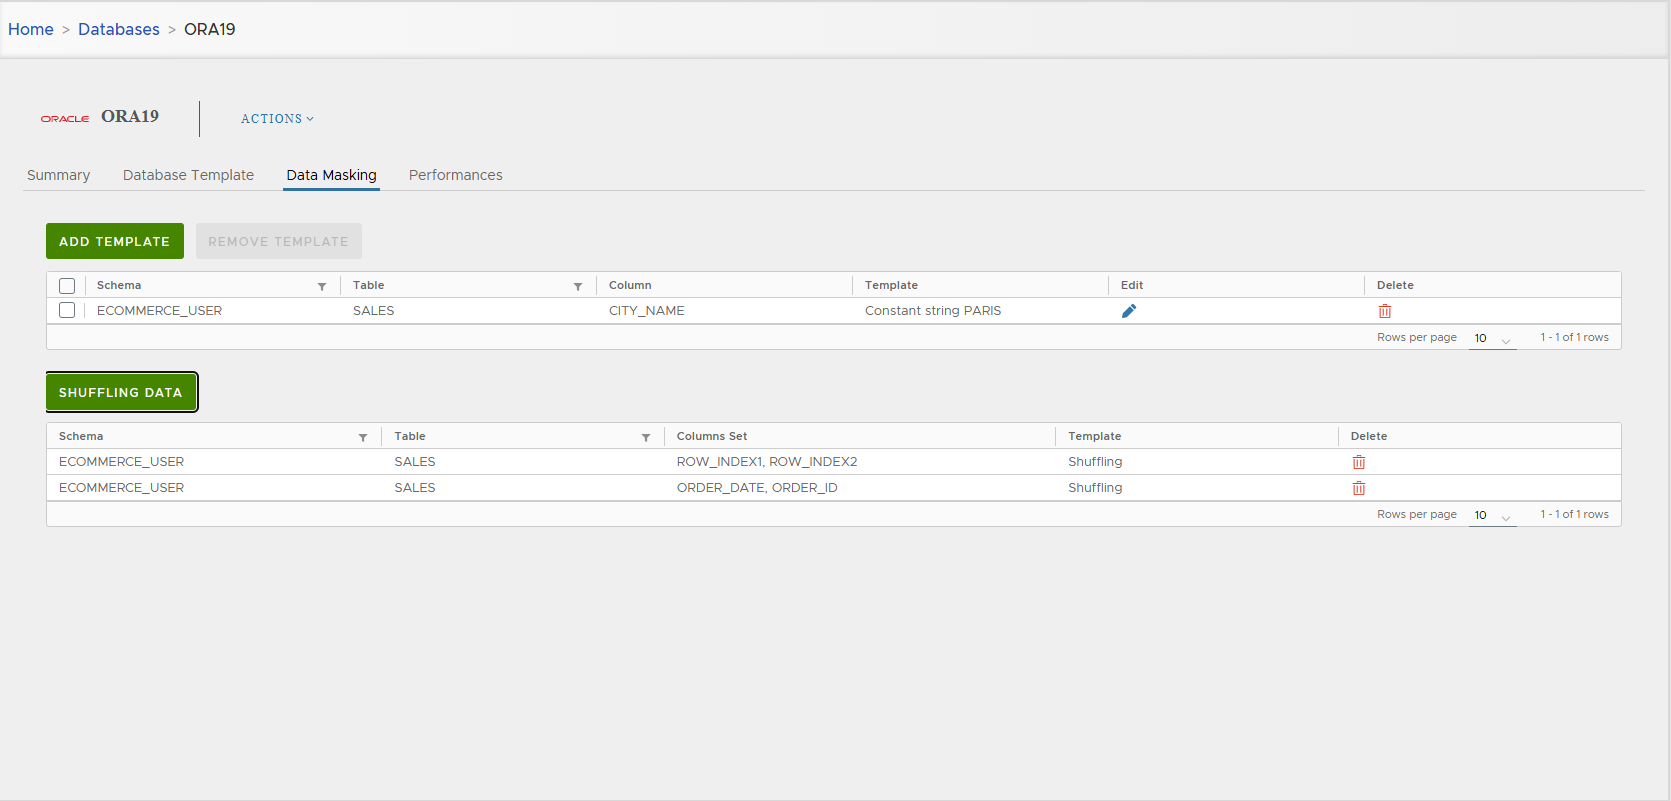
- To edit: open SHUFFLING DATA again and modify.
- To remove a set: click the trash icon for that row.
7) Manage Database Services
Services are the endpoints XLServer uses to connect to the Oracle database.
- View services in Summary ▸ Services.
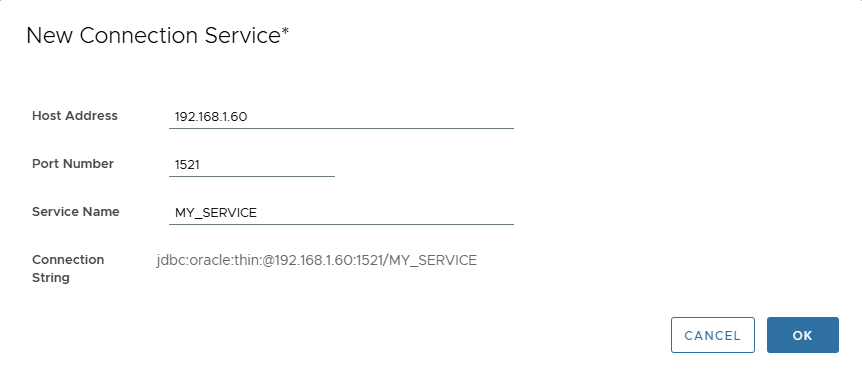
Add a Service
Click + (top-right of Services card) and provide:
- Host Address
- Port Number (default 1521)
- Service Name
Remove a Service
Click the trash icon next to a service → confirm or cancel.
At least one service must remain; deleting the last one is not allowed.
8) Manage Snapshots
Use the Snapshots Calendar to navigate:
- Green dots = recoverable snapshots, red = failed.
- Click a day to list all snapshots on that date.
- Click a snapshot to open detail.
From the snapshot cog menu:
- Create Virtual Database
- Create Physical Database
- Mount snapshot
- Restore
- Delete (only if unused and not the last)
- Close
9) Backup Strategy (Protection Policies)
To meet your SLA/RPO/RTO, attach a Backup Strategy to the live DB. If none fits, create a custom one.
See Backup Strategy Management.
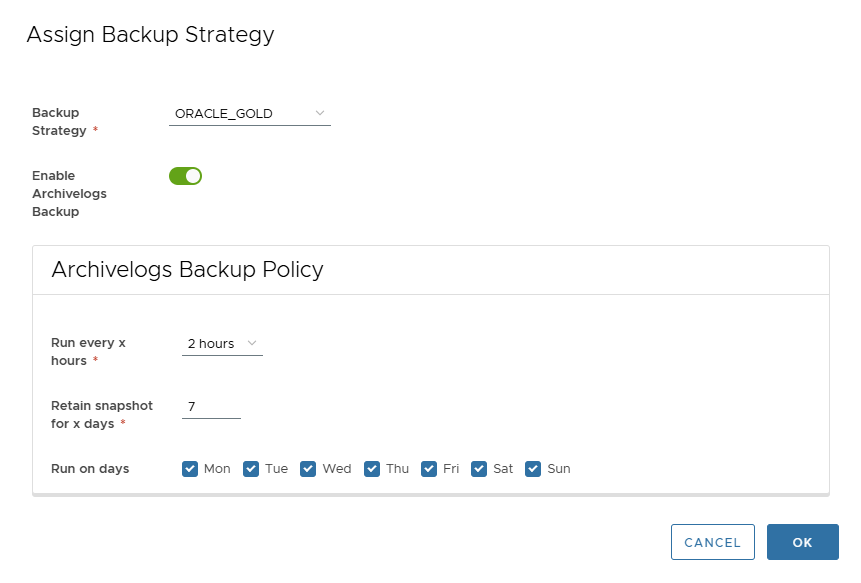
Assign a Backup Strategy
Open the live DB page → click the Backup Strategy pencil:
- Choose a strategy from Backup Strategy list.
- Enable Archivelogs Backup (optional), then:
- Set Run every X hours (interval)
- Set Archivelogs snapshot retention
- Choose Days of week
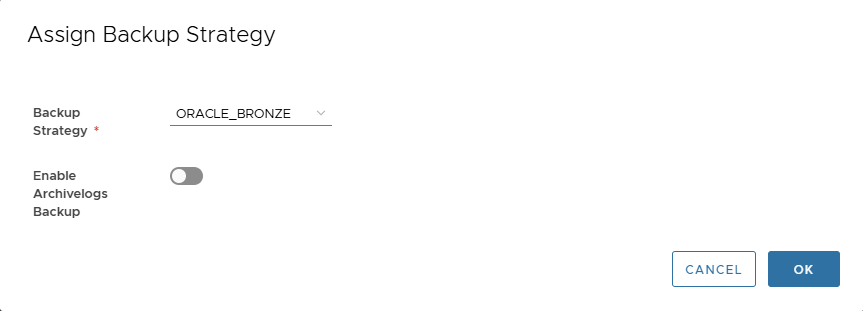
Modify Strategy
Open the same dialog:
- Pick another strategy, or toggle archivelogs backup.
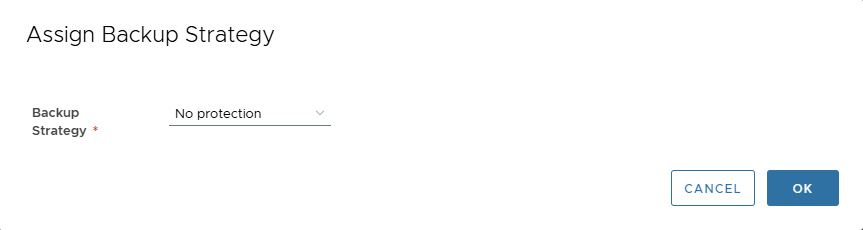
Remove Strategy
Select No protection from Backup Strategy list.
10) Performance Analytics
Use the Performance tab to:
- Check snapshot cadence & health
- Monitor backup duration
- Verify compression/dedup efficiency
- Track storage usage vs snapshots
- Keep RPO in check
(See screenshots in 3.4 Performance above.)
11) Related Topics
- Database Cloning (virtual & physical)
- Database Recovery
- Backup Strategy Management
- Data Masking Templates
- Database Templates
12) Appendix: Oracle User (Required Privileges)
To allow XLServer to perform backups, snapshots, and recovery operations, you should create a dedicated Oracle database user with the correct privileges.
This user will be used when linking and snapshot the database in XLServer.
Example SQL Script
-- Connect as SYSDBA
sqlplus / as sysdba

-- Create the backup user
CREATE USER xlsbackup IDENTIFIED BY strong_password
  DEFAULT TABLESPACE users
  TEMPORARY TABLESPACE temp
  QUOTA UNLIMITED ON users;

-- Grant required privileges
GRANT CREATE SESSION TO xlsbackup;
GRANT SELECT ANY DICTIONARY TO xlsbackup;